Wednesday, 3 July 2013

DIY Baby Jacket

I love making things for my little niece, but she is rather inundated with hand-knitted jumpers from family and friends so my sister asked if I could try sewing her a sweatshirt instead as they were short of those. I couldn't really find any good patterns that were in the right size... so I decided to make my own (it also turned out a little more 'jacket-shaped' than I intended - hence the title of the post!).

I had seen one pattern for a cross-over sweatshirt that was all made from one piece of fabric, it was too small for my niece but it seemed like a much easier way of making a sweatshirt so I started to design my pattern using the same idea.

What you need:

  • another top to get the right size/shape (I bought her a hoody to use but you could use any long-sleeved top - just make sure to make your sweatshirt a bit bigger if you use a t-shirt)
  • paper for your pattern - I often use newspaper for patterns, this time I used kitchen grease-proof paper so that I could trace through (cello-taped together to make it big enough!) or you can use proper pattern paper
  • Fabric - I lined mine so I used 2 different fabrics - one knit and one cotton (I should have used 2 knits to make it stretchy or another stretchy fabric)
  • double fold binding - you can make your own, I actually used some single fold bias binding I had left over and just folded it round
  • buttons, zip or poppers - I used poppers, I wanted a zip but couldn't find an open-ended one in the right size or buttons that I liked enough! Note - if you are using a zip, I suggest sewing that seam first so do not follow this tutorial exactly!
1. First, you need to draw your pattern. 

To do this, lay your top on the centre bottom of your paper and draw round it, then, flip it diagonally along the outside edge of the sleeve. Fold the top in half vertically (as you only want it to come half way across the front on each side) then draw around it again. Repeat on the other side. Unfortunately I don't seem to have a photo of this (I'm sure I took one...) but hopefully the pictures below will be enough of a clue as to how to do it!

Now add seam allowances, and a bit to each side of the front middle where your buttons will be (if you are using a zip, you only need to add a seam allowance here). I would also suggest adding some width to the sleeves as mine ended up a bit tight. Note - I straightened the edges of my pattern using a ruler after I had drawn around the top, this made it easier to sew but I did end up with a quite severe look to the jacket, I would recommend keeping slightly more rounded, unless you want a jacket shape. Then think about the shape of your neckline, I made mine a v-neck, making sure the 2 sides would overlap but this depends on your fastening.

Cut out your pattern, it should look something like this:


2. Cut fabric

Pin your pattern to your fabric and cut around it, do this with the lining and the outer fabric. You should have 2 pieces the same.


3. Sew arm and side seams

Fold the outer piece right sides together and sew along the bottom of the arm and the side seam on each side using whatever seam allowance you drew into your pattern. Do the same with the lining (remember the right side of the lining will be the inside of the jacket). Trim seams and cut a slit at the corner (shown in photo) to make sure it lies right once all sewn together.


4. Add any details to the front.

At this point you need to add an pockets/pictures etc. to the front before you sew in the lining. I went with a little pocket on one side and a cat on the other (my niece's first word was 'cat').

Pocket - cut a small rectangle, bind the top edge, fold in other edges (I cut little triangles off the corners to make them sit nicely), sew onto jacket.


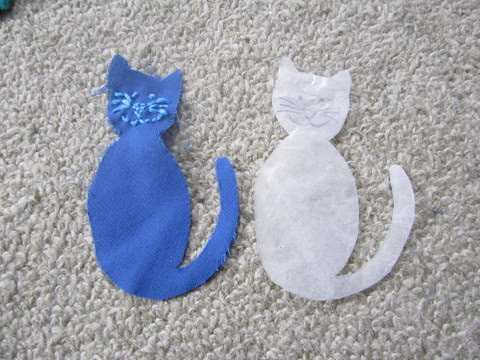
Cat - I drew a cat on grease-proof paper first then cut it out of the lining fabric. I used embroidery thread to make the face then used a zig-zag stitch around the edge to attach it to the front of the sweatshirt.


5. Put lining inside sweatshirt. Make sure to pull the sleeves through and line up the seams. I didn't sew this in until I did the binding.


6. Bind. Pin and sew binding along the bottom edge first (I did the neck and front first but that looked wrong where they met and I had to add an ugly extra bit of binding to the corner).


Then pin and sew binding along the front and neck, ease it around the curves, it will be hard to pin and it will look like it won't lie flat, but it does work out when you sew it!


Finally, you need to bind the sleeves, this is probably the hardest bit. I ended up tacking my binding on to get it in the right place then sewing it. This would probably have been easier if I'd had wider sleeves (another reason to add some allowance to your pattern, along with having to get baby arms in and out!).


And you're done! Mine definitely isn't perfect, but for my first attempt, I'm proud of it. And it looks cute on!


I later sewed a little mouse out of felt and gave it a plaited wool tail that attached into the pocket so the mouse could come in and out of the pocket. I didn't manage to get this done in time before I gave her the jacket (I wanted to give it to her on her 1st birthday) so I did it later and sent it to my sister to add in so I don't have photos of it on the jacket.


Tuesday, 11 June 2013

Musical Fairy Lights


I've had this set set of fairy lights for years and have never really liked them. They were a bit of an impulse buy because they were cheap, but it's taken me until I've graduated and have nothing else to do to give them a bit of a make over. I had them hanging over my keyboard in my room when I decided to do the refashion which is what gave me the idea to do a musical theme. Although it might seem a little sacrificial to cut up music to make into fairy light covers, I used old scores that I'd lost the other sheets to so were headed for the recycling anyway. I really like how they've turned out. If you aren't musical or don't fancy hacking into Mozart's best work, you could use any kind of paper thats not too thick.

You will need...
* A string of fairy lights
* Sheets of music (or alternative paper)
* Scissors
* Double sided tape

1. I started of by removing the original covers on the lights. My next job was to create a heart template. I did this by using my laptop screen as a light box and drawing round a heart I found on the internet (this works surprisingly well although I would suggest using pencil instead of pen incase it leaks through the paper and you end up drawing on your computer screen!). Once you have your heart template, fold it in half to ensure symmetrical hearts and you are ready to start cutting.


2. Now you have your template you need to grab the paper you want to make the hearts out of and fold the edge down so that you can draw round half the heart and cut it to make a complete heart. Its easier to see what I mean in the picture than for me to explain...


3. You're gonna need 2 hearts for each light, so for mine, there were 20 lights on the string so I cut out 40 hearts. Now you're ready to get sticking!

4. Take the first two hearts. Cut two thin strips of double sided tape and stick them to the fattest sides of one of the hearts. Then peel of the back of the tape and carefully line up the other heart and stick them together. You should get something like this...


5. To stick your heart to your lights, take another two small bits of double sided tape and stick them to the round bit of the light stem. Then peel of the paper and insert the stem into the top of the heart and press it together.


6. Repeat this to cover all the lights and voila!

WARNING: I have not checked that the paper absolutely won't catch fire if the lights are left on for a long time and heat up, but I'm pretty sure that if you are using LED lights that they won't get hot enough for this to happen. BUT please be sensible and don't leave them on unattended. I don't want to be responsible for a house fire :)


Enjoy :)

xoxo

Sunday, 26 May 2013

Nappy Bag DIY


This nappy bag is not easy, but I'm not a very experienced sew-er and I managed it (just about!).

(You may notice quite a few pictures are missing from this tutorial because a few things went wrong and I got fed up with the whole thing and didn't want to take photos! Also, I ended up doing quite a bit late at night and just wanted to get it finished.)

I had been looking for a nappy bag for my sister and failing to find one that was waterproof on the outside (she wants to not have to worry about putting it down outside or on bathroom floors etc.), the right size, pretty and a reasonable price. So... I decided to have a go at making one. 

I found this tutorial online. I'm not going to go through the process step-by-step because she does a good job of it and it is very easy to follow. I did make a few changes to the pattern so I'll go through those.


1. Firstly, I used vinyl on the outside instead of the inside, and a basic cotton for the lining. The vinyl I used was quite thick (the type you can buy from the roll for table cloths and stuff) so I didn't use interfacing. If you want a very sturdy bag that stands up completely on its own, you would still need to use it. I also didn't bother to line any of the outer pockets.


Vinyl is very difficult to sew with (I recently temporarily gave up on a project using it because I got so fed up of it not sewing right). I haven't got a fool proof solution but a few tips are:

  • If you are sewing vinyl to a non-vinyl fabric, try to have the other fabric on top so that the vinyl doesn't stick to the presser foot (it may still not feed well through the machine though)
  • I have seen tips online to put scotch tape on the presser foot and I guess you could also put it either side of the feeder on the bottom but I haven't tried myself
  • Use paper clips instead of pins whenever you can to prevent making extra holes in the vinyl (although you probably will have to use pins in some places and it is better to do so than to sew it wrong because it slips and have to pull it back and do it again!)
  • If your vinyl has a soft wrong side, have this facing out whenever possible, this should solve any feeding issues although you may still have problems with tension

2. I also decided that I wanted the outside pockets to be more spacious as I find flat pockets pretty useless. With the side pockets, this was fairly simple. I cut out 2 trapezium shapes, with the shorter side the same length as the side piece of the bag, sewed a casing and put elastic through the top edge (the longer one). I then just lined up the pocket on the side piece for the bag and sewed round the edges. I did one tall one and one short one, I thought they would be good for a water bottle and a feeder cup.


For the front pockets I designed a pattern that made a 3D double pocket from a piece of paper. Basically, you need to hem the top edge of your piece of fabric, and then draw this design onto it (you will need to move the lines depending on the size of your pocket, the margins are the depth your pocket will be) leaving a small hem allowance around the edge where you will sew it to the front of the bag. The dotted lines are just drawn on for your reference, the solid line needs to be cut and the dashed lines are where you will sew.


You then need to fold each corner (4 along the bottom to make 2 pockets), right sides together along the diagonal dotted line and sew along the dashed lines. It should look like this:


Then trim off the corner so you have a neat hem.

When you've done them all and turned it right side out, it should look something like this:


Then all you do is sew right sides out to the front piece of the bag along the seam allowance that you left.


And there you have it. This just replaces the step in the tutorial when you add the front pocket, then just treat it all the same, except for adding the fasteners. I left this until last, as I didn't have any lining on the pocket so could easily sew them on at the end, then I just worked out where they needed to be once the bag was all sewn together.

3. Finally, I wanted an adjustable strap so that it could be worn over one shoulder or two. To do this, I used some square belt loops and a belt buckle (both bought on ebay) and some webbing.


I cut a long rectangle of the vinyl, threaded it through the belt loop and sewed it securely onto the side of the bag. Once I had done this on both sides, I folded the end of the webbing through the belt buckle and sewed it together then threaded the other end through one belt loop on the bag, through the buckle and round the other belt loop them sewed it together. This explanation may sound confusing, and unfortunately I don't have pictures of this but it's fairly simple to work out and if you are unsure, look at any other bag you have with an adjustable strap. Make sure you sew all these bits on very securely using a cross shape. I did a double line of sewing around all of this.


And hopefully, you should now have a functioning nappy bag! This one has now been in use for a couple of months and seems to be doing well, I was a little worried about whether it would be strong enough but so far it's holding up!

Tuesday, 21 May 2013

Baroque Nails (and new No.7 range)


Although I do say so myself, I LOVE these nails! Once I've got a colour on my nails, I often add some glitter to the thumb nail on one hand and the ring finger on the other, just to keep it modern and a little glitzy, but after I saw how nicely these two polishes went together, I had to do it on all my nails. There is something about dull muted tone of the grey that makes the gold less 'in your face' and more sophisticated. But also the glitter is still very much there to made this manicure a little special.


I used a coat of base coat, followed by two coats of Revlon Colourstay in 300 Bare Bones, and then a coat of my trusty cheap W7 gold glitter.

As a slight side note this this blog, I have also just discovered a new top coat from No. 7 called Gel-Look Shine. It's part of a new gel range they've just brought out, which are supposed to 'help prevent chipping and improve ease of application to help achieve a streak free finish', and also smooth and plump the nail. I've only used it once so far, but I have to say I'm impressed. It has left an extremely smooth finish and they haven't chipped yet! And the whole range is just £6.50 which I think it actually pretty decent if all the polishes are of the same quality. I may have to make another trip to the No. 7 counter in the near future...!
Let me know what you think of the manicure and also the new No. 7 range.

xoxo


Monday, 6 May 2013

Decorated Candle Jars


These decorated candle jars are so easy to make and look fantastic just about anywhere. Although any old plain jar can look quite nice with a candle in, these are a little more colourful, and the designs on the jars create different patterns in the candle light around the jars when they are lit which is nice. I recently did this with a group of kids ranging from 3 to 13 and all of them managed to create something that looked really good, so its a great craft activity to do if you have children as well!


You will need...
* Clean jars
* Various tissue paper
* PVA glue (mixed with a little water)
* Glass paint (optional)
* Small paint brushes
* Scissors
* Scrap white paper (to put inside the jars)


1. Start with your clean jars. A good trick is to roll up some white paper and put it inside the jars so that you can see what you're working on a little better.

2. Before you start, mix your PVA glue with just enough water to make it runny (and mine went a bit frothy as well!), like this...

3. So now you can start getting creative. On my first jar, I cut out strips of tissue paper to stick on.

4. Then lay the strips out and paint a thin layer of glue on the back. 

5. The trickiest bit about the whole process is transferring the tissue paper onto the jar, because once it has glue on, it gets very easy to tear (as I learned the hard way!). So be as gentle as possible, and lay it on the jar. It should look like this...

and then just carry on...


6. I also decided to add a little glitter to my jar (surprise surprise!) and once the tissue paper is dry you can use any paint over the top ( good if you don't have glass paint).


And here is the finished thing!


I also did two other jars, one with stars cut out in tissue paper, which is a little more subtle, and one using both tissue paper and glass paints. 

Being a little artistically challenged, I printed out a star template to use..


And here they are. They look a lot better in the dark with a candle in!


Enjoy! :)

xoxo