Tuesday 30 April 2013

Pretty Covered Notebooks

So, another really quick and easy DIY for you, how to take a notebook that looks like this:

And turn it into something more like this:

1. Find some nice coloured/patterned paper (I got mine from Tiger, I think Beth has already mentioned it, probably our favourite shop ever!)

2. Draw round your notebook and cut out about 5mm bigger all round except at the spine (this depends on the thickness of your spine, if it is very thin, you will just need to cut a triangle shape out, I had to cut quite a bit out as my front and back covers were stuck down about 5mm from the top). Also, cut the corners like so:

3. Glue the paper to the cover of the notebook, making sure to line it up where you have marked the paper and folding it carefully around the spine

4. Fold over the edges and glue down 

If you have cut your corners as I showed above, you shouldn't have the gaps like there are on this one, this was my first and I made a few mistakes! It should look more like this:

5. At this point I left mine under some heavy books whilst they dried to make sure everything stayed in the right place but if you had better glue / more glueable notebooks (mine had shiny covers so they didn't stick brilliantly) you could probably skip this bit.

6. Find some coordinating/complementing paper for the inside, measure and cut 2 pieces about 5mm smaller than the inside cover of your notebook. Stick them inside.

I haven't got a photo of the inside of these ones for some reason but here's the inside of one I made for a stocking present at Christmas to illustrate:


And you're done : ) You can add a title to the front if you want, I used a rectangle of white paper stuck on a slightly larger rectangle of the same paper as the inside.


Also, for one of my notebooks, the paper wasn't long enough to go all the way around if I kept the pattern the right way up so in case you have the same problem, work out how far your paper does go round, cut another piece to cover the remained, making sure it is from the right part of the pattern, carefully match up the pattern, overlapping the paper a little bit and glue in place.


Barely noticeable!
So there you go, you never need to buy expensive pretty notebooks again! 


Thursday 25 April 2013

DIY Glitter Striped Make-Brush/Pencil Pot

Anyone who knows me will know that I am bit of a sucker for anything glittery. I'm not sure how this happened, or why...I used to consider glitter a little kitsch and childish, but in recent years I have come to fully embrace sparkles, and am always looking for ways to incorporate glitter into my life! So when I decided I needed a new make-up brush holder, I immediately tried to think of ways to include a little sparkle. This brush pot is super easy to make and could be used to hold brushes or pens and pencils...or anything else!


As you can see the holder I chose had a cute butterfly handle. I got this particular one from a shop called TIGER (side note: TIGER is by far my favourite shop at the moment. Imagine a cross between the market place in Ikea and an arts and crafts store. I literally want everything they stock! Unfortunately, there are only a few dotted around the UK at the moment, but hopefully they will open a few more stores soon!) Anyway, the point is you can choose any plain white pot, mug or cup you want!

Here's how I did it...

What you need:
*Plain white holder
*Glitter paint (I got mine here)
*PVA glue (Also from The Works)    
*Paint brush
*Masking tap

1. The first thing you need to do is decide how big you want your stripes to be. I choose to have mine all fairly equal but you can experiment with different designs. I also think this would be really nice in a chevron pattern...

2. Stick your masking tape round the holder in the areas that you don't want the glitter to be. You are now ready to start painting!

3. Grab a brush and start slapping the glitter on. If you can't find glittery paint, you could always just mix some glitter into some of the glue and make your own. I found that I needed about 4 or 5 coats of paint before the glitter was of the intensity I wanted. Again, you can choose how glittery you want your stripes to be. I also painted the front of the butterfly of my holder in glitter.

4. When the glitter paint is completely dry (I left mine over night) CAREFULLY peel off the masking tape. If you do this too quickly you risk having some of the paint come off with the tape...I learnt this the hard way ;)

5. Finally, give your holder a couple of coats of PVA glue to set the glitter paint and voila!

I haven't tried washing my cup yet, but I don't think it will stand up too well to vigorous washing so perhaps just wipe the insides when you really have to. Now I've realised how cheap and easy this was to do nothing is safe from my glitter obsession. Stay tuned for more glitterized creations soon...:)

xoxo

Tuesday 23 April 2013

Coral and Gold Nails

I was given a load of nail art equipement for Christmas and have been experimenting with it ever since. It has taken a while to get used to using some of the bits and pieces, and its safe to say I've had a few mishaps! But I came up with a coral and gold design the other day which I thought worked quite well so I'm sharing it with you...


I think the colours work great for summer, but also have a bit of an autumn/halloween vibe, making this design quite versatile. 

I'll put detailed instructions below with a list of everything I used and where to get them from. The trickiest bit was putting on the chevron stripes...I tried a few different techniques and found that it was easiest with a pair of tweezers, but you can experiment a little to find the easiest way for you.

What I used...
* Base coat/Top coat
* Coral nail polish (I used Boots Natural Collection Antique Coral, but you could use any)
* Gold and green caviar nail beads (I actually used a set I got from Primark, but these are all the rage at the moment so you can get them from most places)
* Gold nail tape (If you search for nail tape on Amazon, there are load of different options like these... )
* Gold nail jewel (Again, there are load of nail jewel sets. This is the one that I have.)

1. I always start with a base coat and then two coats of my colour, however with this manicure, you need to choose the nail that you want to do the caviar on, and only do one coat until you are ready with the caviar polish. I learnt how to do the caviar manicure properly from this video, which can explain it much better than me!

2. Once you've got a base of colour, you can get on with the fun bit! The jewel nail is the easiest to do. Paint on your top coat, and then quickly pick up the jewel with a pair of tweezers and put it in place before the top coat dries. 

3. The nail tape it a little harder to use. As I said above, you may need to experiment a little to find the way best for you. For the striped nail, I found that placing the end of the tape at one side of my nail, and then sticking it all the way to the other side and cutting it after it was stuck down worked best.

(sorry for the blurry pic!)

4. The last and hardest thing to do was the chevrons. For this, I cut tiny strips of the nail tape, and lined them all up ready to be stuck on. I then carefully picked them up with tweezers and placed them in zig zag lines. Be patient with this...it does take and while and can be a little infuriating, but the results are so worth it!! :) 

5. Finish with a coat of top coat on your non-caviar nails and voila! 

Enjoy! :)

xoxo

Monday 22 April 2013

Headband DIY

For my first post I thought I'd start off with something really simple. I saw this on Pinterest a few days ago:

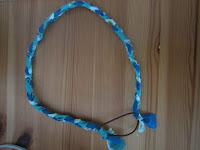
I've been wanting some narrower headbands because I have a small head and my other ones look silly on me! I have LOADS of scrap bits of fabric from stuff I've made so whilst watching Doctor Who I made this:


It was really quick and easy. I just cut 3 strips of fabric out of my scraps about 50cm long (I used pinking shears to make sure they didn't fray). I then tied one end onto the hair band, plaited the strips (do this carefully if you are using strips of fabric to make sure that they sit nicely). When it was long enough to go round my head, I tied the other end to the headband and trimmed the ends. 

I  might make some more in different colours. You could make them out of any bits of fabric, ribbon, cord etc. you have lying around. The one I made has quite a rough look to it because of using the pinking shears to cut the fabric, if you wanted it to look more polished it would probably be better to use cord or ribbon or maybe to twist your strips of fabric before you plait them.